Showing posts with label Home Updates. Show all posts

Monday, June 5, 2017

Final house projects - Hallway, Kitchen & Basement

In the last two months, Jason & I worked quite frantically to finish/complete our house in preparation for our renters. It was a ton of work and very slow going at times, but it needed to be done and now thank goodness it is!

Our hallway was the first project: after scraping, sanding, priming & painting the hallway we realized why we hadn't done this sooner -- there are FIVE doorways with trim and four doors in this tiny space!! That's a lot of cutting in and detail work. It looks heaps better, but my goodness it was pretty tedious!

Here it is: pre-purchase, then after our move in ... lots of peeling paint :(


And now ... better we think.


The kitchen was the next challenge ...

Pre-purchase & then when we moved in ... not in terrible shape on move in but definitely needing some love.


Mid-project -- our favorite peeling paint & finding out how gross the ceiling really was.


And ... finished!


Our other major project was the basement. We had cleaned it all and tried to update a small part of it before Mabel was born, but the rest ... well, other stuff just took precedent.

Pretty icky place when we moved in....


And, when we left ...


We'd been really excited to find an old (probably original) concrete laundry/utility sink in the basement, but it didn't have a stand and is incredibly heavy. We wondered if we should just get rid of it. Luckily, Jason realized he'd been given a work table that he could pop the top off of that was a near perfect fit for the sink. Although it's not plumbed, we thought it was cool to have it in the laundry area as a fixture at least.

As Jason and I were looking through before and after pictures and thinking about all the time, energy and expense that went into this house during our already busy season we did find ourselves feeling a tiny tinge of pride at the transformation. We are incredibly thankful to God for our healthy bodies and healthy kids -- and also thankful for His provision of friends, family and finances -- that made this project even the slightest bit possible. We will not miss all the crazy work, but we will miss our sweet home.


“O Lord our God, as for all this abundance … it comes from your hand, and all of it belongs to you.”  – I Chronicles 29:16

From start to finish --


Tuesday, May 2, 2017

Bathroom Makeover - Complete!!

We finally completed our bathroom do-over -- it's been in-process since October, oh my!!

We had to have one final {flooring} fiasco of course, but it's done. The new flooring is in and we learned how to pull & re-install a toilet -- a skill to last a lifetime :)

In case you can't tell which is before & after, I labelled them ;-)

Here's a couple of the step-by-step on the flooring project - for earlier in-process photos try here and here ...

What we got when we moved in ... stick on vinyl tiles with black goo constantly seeping up in between them. Ick.


Toilet pulled and Dad always has helpers right at hand :)


Floor looks SO SO much better taken down to the sub floor and also with the initial layer of coating. Why didn't we get rid of those stick on squares earlier???


We had a professional lay the new flooring - hurray! We really wanted something {on the cheaper side} that went with the vintage of the house ... this seemed to sort of fit that. The design includes "distressed" markings. Not totally sure what we think about that, but our motto -- it is better.


I was looking back at photos from when we had a pre-purchase walk-through ... not awful, but I have to admit, I like what we've done :)


Wednesday, January 11, 2017

Bathroom makeover - part 2 ... the counter top

We've continued to make progress in our bathroom, slow progress, but progress nonetheless. The latest has been to figure out what in the world to do with our pastel tile counter top. Ugh.  Pretty hideous, especially with the new paint color.


Since (as always) we're on a budget, we figured it couldn't hurt to try the $25 Tub & Tile Refinisher first. Although it was VERY strong smelling and a bit stressful making sure we followed all the steps so that we wouldn't botch the application, we're pretty pleased with the results. Not perfect, but much much improved -- we think :)


Vanity area now looking a bit more like a real bathroom -- besides the tile refinish and the paint on the walls, we've added a light fixture & mirror (both were nonexistent when we moved in) and replaced the broken/leaky faucet. Next task: the flooring.


Friday, November 18, 2016

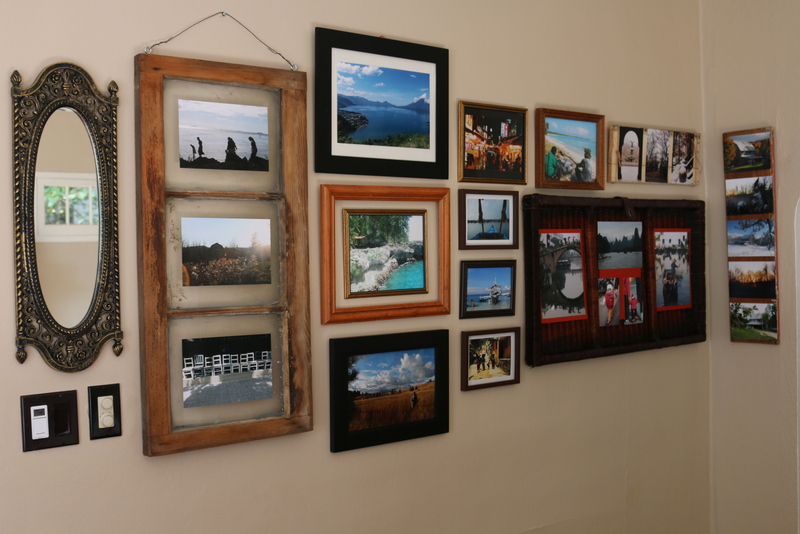
Putting pictures on the walls ... finally

Although we've lived in this house for over a year the only pictures/decorating that had been done until recently was this ...


... a few pictures propped up on our mantel.

The rest of our walls had been left bare. Not very homey feeling. I finally took on one of the walls and got some pictures from our past put up. Funny how such a small task can take so many months to tackle and yet has already brought me so much joy to see.

I suppose it might not have taken so long if I'd just been willing to purchase nice frames; but I didn't want to spend the money. So instead I scrounged around our garage and basement and picked up a few frames at the dollar store and (surprising myself) I actually really like how it turned out ... the old window, the basket lid and the pieces of junk (I mean ... reclaimed) wood make it feel alive to me which seems to be how a gallery wall of one's life should feel. Alive. 


(Two of these photos were not taken by me, although I was present when they were taken. Middle photo on the window frame (our barn-home in VT taken by Michael Maslowski) and top row fourth photo from the left (Uoleva, Tonga taken by fellow volunteer, Cristina)

Monday, October 17, 2016

Bathroom makeover - part 1

Last Monday I had a really, really rough day with Luke. On a daily basis his actions remind me of how quickly and easily he will hurt Mabel, on purpose and without provocation. Last Monday we nearly ended up at the hospital; all because I stepped away from him to put a bagel in the toaster.

Of course parenting can be very exhausting - the constant-ness of it and how little ever seems to be accomplished. After that particularly stressful & draining day, I needed to do something where I could actually SEE results and I took on our bathroom :)

We are super happy to have a fully functioning bathroom - hot, running water and a flush toilet are things we have lived without in the past and we know we are blessed with these luxuries. That being said ... pictures of our bathroom weren't even part of the real estate listing when we bought our house. It was/is a bit sad looking.


When my Mom stayed with us after Mabel was born, she graciously sanded and painted the window trim, the door and the vanity cabinet. Afterwards, she re-grouted the vanity tile-top and scraped all the black gunge from around each the floor squares. What a trooper!

Shortly after, we even got a door knob for the door and were feeling very fancy :)

My project focused just on one wall to begin with ... getting rid of the crazy tile (that does a full loop around the bathroom!) and applying paint. Seemed simple enough. Of course in this house nothing is really simple.


The tile was hiding some very interesting wall repair work ... not something I have the skills to fix properly. What do you do when part of your wall sticks out a half inch farther than the rest??


After I got some sample paint up, I realized that similar to our bedroom painting fiasco the paint was peeling off in huge sheets and the wall would need to be scraped, sanded, primered and then finally painted. Lovely.


After nearly a full week of working on just this one wall during every free moment I had from the kids, here's the result. Exciting to see what it can look like, but also pretty daunting considering how much is still left to do.


(color = Whirlpool with Dover White)

Wednesday, October 5, 2016

A house, painted.

A picture of our house pre-purchase. Even before we made an offer on it, I really wanted to give it a face lift. The colors just didn't seem to work. And while I don't know if we really nailed the new color or not, I know that at least it's an improvement :)

Unfortunately, the week prior to paint day was absolutely horrendous.  A crew of volunteers was scheduled to do the prep work the weekend before (which had been a huge relief to us as there was SO SO much peeling paint to be scraped and sanded), but it was as if they too realized what hard work it would be and decided to just not do it.  Instead things were done which we had to turn around and spend time un-doing.  Unbelievably disappointing, frustrating and incredibly stressful. 

We didn't want the paint we'd purchased to be applied to unprepped surfaces so we spent the week frantically completing the prep ourselves -- at all hours of the day and into the night. We had friends from our small group come help and Jason's parents came down for a day as well. Collectively, we must have put over 70 hours into it just during that week. Thankfully, it was also Jason's first week of school so he did not have much homework yet and no long lab classes, and his student job hadn't started yet ... so he had more time that he would the rest of the year. It felt a bit like we were being tortured, but we got it done.


Over 150 volunteers worked on our house. The day before paint day, we had the U of I track team helping us finish the prep work and on paint day volunteers came in groups of 20-30 for a couple hours each; both groups were diligent, hard workers with great attitudes. In spite of the incredible stress from the week before, we continue feel overwhelming grateful to the students who spent their time making our home look a little prettier. 


Friday, September 23, 2016

Porch makeover

Before we purchased our home last year, the inspector had pointed out some rather suspect looking support posts on the covered front porch. We'd also noticed that the floor boards seemed pretty worse for the wear. Last winter when we had precipitation coming through the gaping, rotten floor boards into our basement, we knew we really were going to have to do something about it before too long.

Finding a trustworthy, economical & skilled contractor became our next task ... not easy in the middle of their busy season. Thankfully after several rounds of dead-end phone calls, we finally found someone with availability for the right price. Thank you!

I don't have a really good "before" photo of the porch, but came across this one of my Mom & Luke from a year ago which gives an idea of what it used to look like.


In process ...


Support posts were definitely rotten and the lumber originally used is now not considered adequate support.


Now that the more serious stuff has been completed, time to get stain, varnish and paint on.


Finished ...


Monday, September 19, 2016

Picking exterior paint colors

***Warning ... this post is completely about a first world problem & I know it***

Since before buying our house, we've known it would need new exterior paint ... and we've very much wanted to update the exterior color scheme. Since our homeowners insurance was requiring us to fix some of the peeling paint, it seemed like this summer would be the right time.

We had absolutely NO idea just how difficult it would be to pick the right colors though! Or how excruciatingly tedious scraping/sanding/primering could be. Or how incredibly stressed we would already feel just trying to accomplish a few small home projects in the midst of Jason's independent study course, his job, being present with our kids and trying to have a few fun moments.

We were completely blessed by a friend who referred us to apply for a program through the university where a group college students come paint your house, for free. We applied and were one of three families accepted. What a huge praise! Although we were warned the students would likely not be as detailed in their work as we might be, we came to the realization that prepping and painting the house ourselves would have to become an absolutely all-consuming endeavor if it was going to be completed at all. We were so so so thankful to be part of this program.

So, back to picking colors ... we had decided early on that we wanted to do a beige house with white trim & a black door/accents, but we had no clue just how many beiges there are ... or how many whites! It is truly crazy.

Then, in the midst of searching for house photos with different beige paints, I came across a photo of a house with a green door and realized that while the black looked really crisp & sharp, how much more inviting the green looked to me. So that began a whole new hunt ... finding the right green, then finding beiges/whites that also looked good against it. Oh my.

We were fortunate to have our detached garage to practice on.

The before picture -- from last winter (brrr!)


Starting to narrow it down ...


A little closer ...


And, we think we have our winner -- we liked Naturel but it wasn't a whole lot different than our current house color and so went with Stone Lion. Ta-da!


Then we really started to get serious about which white to use for trim -- Aged White, Dover White, Aesthetic White or Alabaster. While picking these out, we came across the (rather boringly named) Khaki Shade which was a great in-between from Stone Lion & Naturel. Alabaster (white) was listed as a coordinating color for both Khaki Shade and Olive Grove making the white paint decision much easier.

Here's the final decision applied to our garage. The house has also been completed at this point ... photos soon!


Saturday, February 27, 2016

Living room -- updated

We've very slowly been getting our living room together. Since we moved in we've been on the hunt for a used couch that hadn't been exposed to pets or smoking. Not an easy task! Last month we finally found one that was in our price range!! Hurrah! With the addition of a real couch, our living room has suddenly started looking like maybe grown-ups could live here.

Here's what the living room looked like before we bought the house --


When we moved in things were better -- the room looks pretty nice but what you don't notice is the window trim (see all that black?), the 3 curtain rods tacked in a row right onto the trim, the food (?) stains on the ceiling, the missing outlet & light switch covers or the 20-30 hardware holes in the walls that needed patching & painting.


After living in the space for over seven months, it's finally starting to feel like a home.